Showing posts with label canvas. Show all posts

Monday, September 2, 2013

Real or Fake?

While mindlessly poking around on the internet today I saw an article about the number of resellers crashing Etsy's Economy and killing to mood for handmade sellers. Stories of handmade artists having their designs and product photos stolen by Chinese Factories can sure make you shudder - especially if you create and sell your items through this online marketplace!

Etsy claims to be a site that fosters handmade. They have thrived on the ideal that everything sold on their site comes from an individual, a person that makes each item with love and care. Yet they have had to create teams of people to police their site for "resellers." If you ask me, I'm positive the Etsy police can't patrol the rip-offs as fast as the Chinese factories can make them.

Alibaba is a wholesale site selling items manufactured in Asian countries. Alibaba is well known among Etsy sellers as a site that fosters resellers and rip-offs. Most stories of Etsy products being mass produced without permission from the artist are linked to an Alibaba listing or twenty. (For those of you wondering what you are supposed to do when intellectual property is stolen by Alibaba, I would direct you to their complaint form. I can't personally speak to the effectiveness of using this form but I would love to hear from anyone who has had experience with this.) Occasionally I make a point to surf the massive site for my items being pawned off at a discount rate. A simple "teepee" search reveals... Alibaba sellers still can't make a real tipi. Let's do a quick comparison.


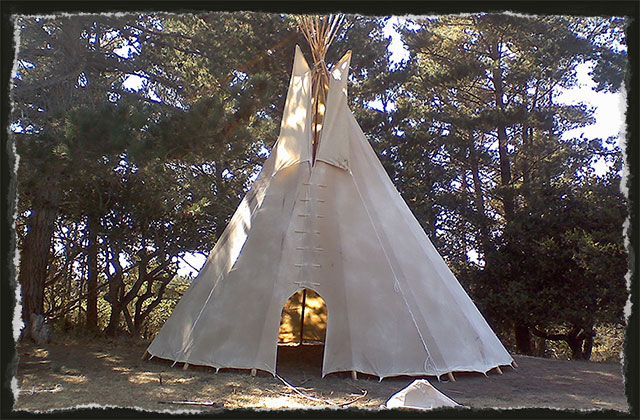
A Real Tipi Tepee Teepee:

  • Has 13 to14 poles total depending on the tribe making it.
  • Has 3 to 4 poles (again depending on the tribe making it) called "lift poles" that form the base upon which the other poles are added.
  • Is cone shaped with a round footprint. 


The pole structure of an 18 foot Sioux-Cheyenne Tipi. Photo thanks to my wonderful friend M.


  • Is held together with small wooden sticks called lacing pins.  


Lacing Pins being put in during a tipi setup. Photo thanks to M.


  • Is sewn together from very long strips of canvas resulting in beautiful seam lines on the inside. (When laid a flat tipi looks like an imperfect half circle.)


See all the lines? Only a real teepee has awe-inspiring lines like that. Photo thanks to my friend M.


  • Has smoke flaps on the upper front to control the airflow inside the Tipi. These are controlled by two additional poles and secured with ropes from the lower corners to the ground.


Many Thanks to Little Joe of Ahki Tipi for use of this photo.


 Now lets look at a wannabe tepee:


For sale here if you happen to need 50 or more at a time.


  •  No smoke flaps. A strange cap instead...
  • Only 1 steel pole in the center, not 13 or 14 poles. The sides are staked down.
  • No lacing pins.
  • Is Technically a TENT, not a Tipi Tepee Teepee.


What does it have in common with a Tepee though? It is cone shaped and round. It is made from canvas. That's about it.


The problem with these wannabe Teepees (or Cheepie Tipis as a friend of mine calls them) is that they don't have all the strengthening features that a real tepee does making them vulnerable in many ways. Authentic Teepees have reinforcement patches, a time tested structure that is erected and bound in a way that resists strong winds and heavy snow, openings at the top to allow a fire inside without smoking out the people inside, and most importantly - tradition. To me, a real tipi is made by someone who has a great love and appreciation for the history of the tipi and it's people.

This brings me to my closing thoughts. I am proud to make real tipis and pleased that the imitation tipis are so inaccurate and (personal opinion) ugly. I am thankful to have been able to learn my craft despite all the challenges I encountered. Most importantly I am grateful for the friends I have made along this path. Many thanks go out to Maria (the Spanish speaking lady who taught me to sew my first tipi front), Linda Holley (who wrote the most amazing book about Tepees and aided me in producing a historically accurate pattern), Little Joe of Ahki Tipis (who constantly inspires me by making tipis the traditional way taught to him by his grandmother), Marian (who lives and dreams in one of the first Tipis I made and is always the source of a good smile), and my husband (who pushes me to keep reaching for the sky.)  Much love to you all, wado.

Wednesday, July 3, 2013

A Good Day for Roses

Roses and Canvas
I had a friend from High School drop by the other day. She noticed my roses in front were blooming and asked if she could have some. Of course I said yes.


Emily modeling a Tiny Tipis Canvas Bag
  Seeing as I didn't have a vase handy I decided to have her put her bouquet in one of my canvas bags. Hey, if it works for fresh produce why not fresh roses, right?


Fresh cut red rose being kept safe in a Tiny Tipis Market Bag
 She couldn't have picked a better day to come see me. All the rose bushes were in bloom and her yellow dress really complimented the colors.


The Tiny Tipis 10 ounce Canvas Grocery Bag even keeps flowers fresh until you get home!
Thorns aside, I think she really enjoyed getting to pick her own roses.


Emily smelling a fresh cut rose before she puts it in her new Handbag
 Even though the flowers were contained in the Canvas Tote the lovely smell was not. I wonder how long her new bag will smell like roses.


Roses just peeking out of the bag.
 Look at the smile on her face! I'm not sure what I like better, seeing someone put one of my bags to good use or enjoying my roses.


Home Grown Roses in a Tiny Tipis Canvas Bag
She grabbed a few more after I snapped this pic. I think if I let her know when the next bloom cycle comes along I'll be seeing her again.  :)


You can buy your own Tiny Tipis Canvas Bag and use it to store and carry just about anything. Sorry, roses not included.


Tuesday, June 11, 2013

To Dye For

Select your color here.


 NOW AVAILABLE FOR PURCHASE ON THE WEB!!!

Tiny Tipis has listed more colors of Vegetable and Produce Dyed Bags for your visual consumption. These all natural bags will last longer than store bought canvas bags and they boast a wide variety of colors that can only be found in nature. No two bags are alike making them a true natural tie-dye.


Read about Tiny Tipis first event here.


 Hand Painted Designs are available at your request. Custom orders welcome. Get noticed carrying a Tiny Tipis Dyed Bag!!!


Dyed with all natural Vegetable and Produce Based Dyes


Every Tiny Tipis Dyed Bag is unique.


Friday, April 19, 2013

Giveaway Winner and Territory Days Debut

Tiny Tipis is going to Territory Days!


A big thank you to everyone who entered the giveaway and Hello to all my new readers! The giveaway brought in new fans from around the world and earned one lucky person a Tiny Tipis All Natural Hand Dyed Market Tote. If you missed this chance to win FREE Tiny Tipis products keep reading - there will be more opportunities in the future! Many Thanks to Created By Laurie for Hosting the Giveaway.  :)

Tiny Tipis is glad to announce our upcoming debut at Territory Days in Colorado Springs, Colorado. Territory Days is one of the largest festivals held every year in the Springs. We are excited to be attending our first event as a vendor and hope to see you there! Attendance is FREE with lots of things to do, shows to see, and shops to check out!


Read the Tiny Tipis Blog
Get Inspired by Tiny Tipis on Pinterest
See the Tiny Tipis Videos on YouTube


Thursday, March 7, 2013

To Dye For


 I love Natural Dyes. It's a recent thing. Maybe even a new obsession. The smell, the variety, the mystery of what will I get this time?... It makes my heart go pitter-patter.

Canvas Market Tote in Rose
When I was in 1st grade I sat next to a boy named Wesley. Other kids made fun of us. We didn't care. We used to sharpen our colored pencils together with a common interest in the resulting color of the shavings.  Somehow, for some strange reason, it made us happy. Wesley and I bonded over the simple pleasure. 


I haven't seen Wesley since 1st grade but I still think of him when I mix colors. The child-like eagerness to experiment comes back in the blink of an eye. I wash my soul in the colored water and it gives back to me the vibrant joy I seek.

Only Nature makes colors like this...

You can purchase a piece of my soul if you like. It comes in the form of a soft hand dyed market tote that will serve you well for a long time. I guarantee it is made with all the love and care one can put into it.


Monday, February 25, 2013

DIY Tie Dye with Red Wine

Easy Do It Yourself Dye

 I'm obsessed with Fabric, especially canvas. It's natural, it's strong, it has more uses than a swiss army knife... and it can be a challenge to Dye. There's nothing I love more than a challenge. 


I also love red wine. 


Here is how I use Red Wine to Dye Fabric, including so-called "non-dye-able" Canvas, and a shirt I never wore:


Supplies: 
White or light colored fabric (I used cotton)
2+ cups Red Wine
Rubber Bands or Hemp Twine
Oven
Clean Baking Pan
Jar or Bucket 
Iron
An Old Towel

Supplies laid out ready to start dying fabric


 Step 1: Tie up items to be dyed. If you bind it with more wrinkles you will end up with more light colored areas after you are done. The tighter you tie or band it up the more areas of light color will remain as well.

Cotton articles tied up and ready to be Dyed with Red Wine


  Step 2: Steep the items in the Red Wine for at least 2 hours. I let mine soak for 4 hours.

A white shirt after soaking in red wine for 4 hours


Step 3: Squeeze the wine out of the fabric. Leftover wine can be saved to re-use next time you want to dye but the color won't be quite as strong. For really dark dye wring until no liquid drips. For lighter dye wring as much out as possible.

Wine Dyed items being laid flat to dry in the oven


 Step 4: Lay items as flat as possible on your clean baking sheet. Try not to let them touch or overlap so the color doesn't bleed from one article to another. Your baking sheet must be clean or you risk discoloring your dyed items. I covered mine with foil just to be safe.

Wine Dyed clothing and fabric drying in an oven


 Step 5: Set oven at 170 to 180 Fahrenheit with damp dyed items inside. The combination of heat and drying with the wine pigment still on the fabric helps set the color. Make sure to set a timer so you don't start a fire. I checked on my items every 10 minutes. The small items took about 20 minutes to dry fully while the shirt took over an hour. I didn't want to put freshly dyed items in the dryer in case it might leave color behind which is why I chose to do it in the oven.

Check your items every 10 minutes: Safety First!


Step 6: (This step is optional. I did it to make sure the color was fully set.) Lay your old towel on an ironing board. Iron dyed items as you normally would. The heat will help set the color so it won't fade with washing. The towel prevents your ironing board cover from getting any color on it if your dyed articles aren't fully dry yet.

Small test items in a Red Wine Dye Project


Step 7: Hand wash dyed clothing and fabric in warm water to get rid of any pigment that didn't set. This way the color won't spread to items you don't intend to dye when you wash it after regular use. After dying an article you should avoid washing it in hot water to keep the colors bright.

Gorgeous color and pattern from Red Wine Tie Dye


 And the finished product... 
I like this shirt so much better with the natural earthy rouge dye than I did when it was plain white. I think I'll actually wear it now!


Thanks for reading!!!
Click here for more great DIY ideas or visit the other Tiny Tipis Blog to learn about recycled urban gardening.


 Tiny Tipis is a small handmade company providing environmentally friendly products to help customers reduce their carbon footprint. We focus on using high quality materials with attention to detail and running our company as close to zero waste as we possibly can. All shipping materials are recyclable, compostable, and/or biodegradable. See more of what Tiny Tipis does for our planet at any of the links below: 
 

 Thank you for being environmentally responsible!!!

Wednesday, December 12, 2012

The Greatest Gift of All

Yep, you guessed it. It's that time of year again when the reindeer are out and Santa is about. People scurry to and fro to get the latest gadget to give them more mojo... and bloggers become poets who don't even know it. Oh my!

I'll keep this short, sweet, and to the point: COUPON CODES!!!

For 10% off your entire order from www.TinyTipis.etsy.com use HOLIDAY2012

If you prefer FREE SHIPPING check out the new Tiny Tipis Website! We just added the option to purchase directly from us and are offering free shipping through December 2012 on all orders.

BONUS!!! All orders shipped in December will be gift wrapped so you don't have to worry about it! Nothing says Christmas like a pretty present under a tree.

If there was ever a time to buy it is now! Shop happy, stay warm, and keep safe through this holiday season.  :)


To keep up on all the future sales follow Tiny Tipis on Facebook:  www.facebook.com/TinyTipis

Find our inspiration on Pinterest: www.pinterest.com/TinyTipis

And as always, Shop Tiny Tipis online in any of the following places:

Thursday, August 9, 2012

All the Small Things

This month has been a busy one. July marked the first charity event I've ever led in my life. I've also been trying to play catch up with cleaning at my grandfather's house. He's been slowly loosing his vision for years and the outcome is that he stopped being able to clean well. Years of dirt and grease caked on everything takes more effort to remove than you could ever know. But he is a wonderful man with amazing stories and I don't mind it so much.

I'll be moving again in less than a week. The house I signed a lease for has a greenhouse and enough yard that I will be starting a chicken coup ASAP. If all goes according to my master plan (Mwahahahaha!) I will have 5 polts (teenage hens) before winter. I already picked out the names for them... Brittany, Miley, Christina, Salena, and Gaga. Yep, I'm naming my hens after female pop stars who's music I never listen to. I think it's somehow fitting.  :)


Handmade Cards for my Mother-in-law
One of my most recent projects was making cards for my mother-in-law in trade for composting worms. The theme I went with was shadows. I ended up making her one with flower shadows and the other was the shadow of two people holding hands on the swings. I left them fairly plain so she could scan them into her computer, add her own inspirational text to fit the occasion, and print. Sort of an everything card if you will, she can make it say whatever she wants.


Lacto-Fermented Veges
I've taken it upon myself to learn skills that would be useful in a Zombie Apocalypse situation. (The zombie part is really a generational thing. Many pointless hours of my youth were spent discussing the in-depth dynamics of zombie behavior.) I think self-sustaining practices are a golden way to survive though, zombies or not. This is why I made my first attempt at Lacto-Fermentation.  I had made a batch of farmer's cheese and was in need of ways to use my leftover whey. Part of it went to make bread (and it was AMAZING) while the last spoonfuls went into jars of chopped carrots, onions, and celery. I put some herbs and spices in the jars as well with the salt water and left them on my counter for 5 days. The taste test after the 5 days proved I had indeed succeeded. The jar on the left was a wild idea to add cinnamon... I don't recommend adding cinnamon to salt based preservation methods. That jar got tossed. This is something I plan to keep experimenting with though.

I have a million more projects in the making. Some of the posts you can look forward to include a Super Secret Summer Beverage Recipe, frugal ways to entertain a child in the shower, cloth book making, an upcyled shirt tutorial, and how I made my amazing Home and Meal organization binder. Keep watching and reading!

I'll leave you with the amazing photo I took of the baby praying mantas I found chilling above my front door. He only stayed for a day but his company was a refreshing change from all the wasps and ants. Check out those spiked forelegs!
Praying Mantas in Colorado


To keep up with all the new items and specials in my shop like me on Facebook or follow me on Pinterest. I also recently opened a Zibbet store. If you prefer to support the artist and not the middle man Zibbet is a great place to buy.


Saturday, July 14, 2012

Confessions of a Crazy Crafter

     Sometimes I think Springs and Summer are my favorite months. I feel incredibly productive with so many hours of light! One of the things on my plate this summer is leading a charity event for an animal shelter. I chose the Teller County Regional Animal Shelter to help on behalf of Artist's Helping Hands for many reasons.
     - They are a no kill shelter meaning they do not put animals down if they don't find owners.
     - They aided many people that evacuated during the Waldo Canyon Fire in Colorado.
     - When our dog found his way to their shelter they called to let us know and took such good care of him while he waited for us.
help furry creatures
Cassius the Great and my wonderful little man pose for me.
I'm excited to collect donations during the month of July 2012 for them and have already seen a great show of support from the charity group. I hope to hand out treats to some of the animals when I deliver the donations. If I am able to I will make sure to take pictures and post them.

     One of my personal projects this month is a cloth book of shapes for my son. Using an old pair of jeans and some colorful fabric scraps I've managed to cut out squares, diamonds, circles, rectangles, ovals, stars, and triangles. I am then sewing these onto large pieces of fabric which will become the pages. I can't wait to see the look on his face when I give it to him. Books are his favorite "toy."

     As I face moving in some 45 days I find myself hoping this next home will be a place I can stay for a while. With 3 bedrooms, a greenhouse, and an area inside large enough for me to start making full sized tipis it sounds like heaven to me. The yard is a decent size as well (though it needs a lot of work) and I hope to get permission from the landlord to keep chickens. It's a big move. The house needs a lot of work... cleaning, repairs, TLC, and such. The price is right though and despite all my nervousness I'm really excited to start on such a large project.

grocery bag shopping tote quality canvas sack     As far as Tiny Tipis goes I must say it is well. I recently filed my LLC forms making it an official company. It's the first step in taking things to the next level. I've also been evaluating ways to expand and offer more choices. One way I plan to do this is by offering hand painted bags. These are fairly easy to do, don't take up extra space in my currently small home, and the end result is making my customers very happy. For each new design I keep a stencil that can be traced on the canvas and then paint each one by hand with acrylic paint. I could cut corners and iron on printed designs but I don't want to loose the personal touch the hand painting adds not to mention the higher quality end result. I plan to start a line of more modern ones as well that will feature graffiti style art.


     For my own closet I decided to go through it and start recycling and upcycling my old clothes. A work in process is this thin shirt. It had holes at the hip seams that needed fixing and I decided to start giving it a new life. As soon as I finish it I will post a step by step blog on exactly what I did to it. Of course I had to add some lace to it.  ;)

recycled top feminine
I love lace  <3 <3 <3

If you would like to follow my garden blog you can do so here!

Thursday, June 21, 2012

Fabric Bowl Project Obsession

http://whipup.net/2008/09/20/how-to-fabric-bowl/
I've been a bit obsessed with fabric bowls this week. What a useful concept! They are washable, portable, and nearly unbreakable (perhaps the most useful feature for a stay at home mom.) I saw a picture on pinterest of a tutorial on how to crochet a sturdy bowl using multiple threads. When I clicked the link of course they wanted $4.99 for the "pattern" so as a seamstress/artist/creative type I stared at the picture for a moment and then set about making myself a bowl. I've since moved on to making nesting bowls for my husband and I's fifth wheel as these proved so nice.

First I would like to cover the various types of Cloth Bowls I saw. There are wrapped and sewn bowls, pattern sewn bowls (I call them petal bowls because of how the pattern looks before sewn), woven bowls, glue hardened bowls, and crocheted bowls. Of these types of handmade bowls the ones hardened with glue or fabric stiffener are the least portable. A soft bowl can be folded so that it fits in a small flat area and takes up less space - something I appreciate very much for storage space in the camper.

I decided to try the crocheted bowl since I had the materials readily available. Since there are two threads involved it makes the bowls a little stronger and more able to retain shape. The outer thread that is seen is plain yarn while the inner thread is an old t-shirt I cut into strips. The t-shirt yarn is thicker than the regular yarn so it gives the bowls the stability the standard yarn lacks. As you can see in the photo I used a single crochet and simply worked my stitch around the t-shirt yarn. When I've completed 10-15 stitches I gently tug the t-shirt yarn and it tightens everything. I repeat this the whole way through giving the bowl a more finished look. Don't tug too hard on the t-shirt yarn though or it will cause the prior stitches to buckle. 

I don't really have a formula or pattern I follow. I increase stitches and do my best to keep the first few rows flat and even because these become the base of the bowl. When I have the base 10% larger than looks needed I stop increasing so the sides will start to come in. I like to pull the sides of the  bowl in at the top as an extra stability feature. I do this by decreasing stitches on the top 2 rows only. I do the top 2 rows with a contrasting standard yarn and no t-shirt yarn filler. 

You can cut the t-shirt yarn and simply leave it loose in the stitches over it or you can pull it out and use it as a decorative stabilizer. I pulled my white t-shirt yarn out when the main bowl color ended and stitched it in swirls around the exterior of the bowl. This seemed to pull the various rows together even more and added a look I liked. 

The first bowl I made. It contains my husbands lighters on the counter.
There are no limits to these bowls except your ability and creativity. Crochet stitches come out so try something new. If you don't like it just pull it out!

To see other things I've made that are for sale or to request custom items and art visit my Etsy Page.


Sunday, April 15, 2012

Tiny Tipis Goes International

A Simple Inspirational Moment

Shipping is a major part of any company these days as the internet digs it's claws deeper into every corner of the earth. People in Russia could be reading a blog that you might have written for an American audience! Such is the nature of the beast though with Twitter, Facebook, Pinterest and the likes taking over the generation I grew up in. Today, I discuss shipping because I had a first for my business. Today, I shipped Internationally for the first time.

I hadn't planned on shipping globally yet. I figured it would be months, maybe even years, before I would need to. When I received a note from the buyer saying I could send it to either a United States or Australian address I was at first inclined to send my canvas items withing where I am familiar, but; that brought up questions. What would it cost? Was it reasonable? Should I expand my company to serve that many people?

I quickly pulled up the USPS website and typed in the info I had. The page loaded and I scanned down the prices until I got the option I normally use within the US. Well, I thought, that's not as scary as I expected. Besides, it really wasn't up to me if it was reasonable or not. The buyer could decide for themselves.

I sent my customer the prices I calculated plus a dollar of buffer. I gave them more options than I anticipated I could have this early on. The response came quick along with a paypal payment to my account. The deal was good! I had my first customer located in Australia and my first chance to expand past the boundaries of the United States.

The next morning I packed my truck with boxes and envelopes to ship including the envelope marked for Australia. My stomach gurgled at me with nerves as I hopped in the drivers seat. I knew the principal of what I had to do. Step 1, find the correct forms. Step 2, figure out how to correctly fill our said forms. Step 3, hope I calculated my prices right.

I was lucky and got to the Post Office during a slow time so there wasn't a line. It always makes it easier to interrogate the workers about shipping regulations when there isn't a chain of angry impatient people behind you. To my surprise, I had grabbed the exact forms I needed. Check a box here, enter a weight there, fill in the addresses, and sign the bottom... the lady stamped the square in the corner of the page I filled out and complemented me on needing minimal guidance.

I asked if there was a way I could take a few extra customs forms so next time I needed to ship international I would be more organized for them. The lady helping me was thrilled. "Of course!!! We encourage it!"

On my way home I thought about all the times I had mailed letters as a child. As I grew up technology started to take over the times I would have normally slapped a stamp on an envelope. Bills, letters to family, photos, Christmas cards with money... all things I can do easier from a computer.

I felt triumphant. It didn't matter how simple the process was, it was something I was clueless on and highly unsure of. I had shied away from it but now I saw that there were so many more customers available. Shipping need not stop me now.

For today I close with this thought:

 May we never stop learning with soft hearts and open minds. Let us conquer the world with love and knowledge. Never give up.


Thursday, March 8, 2012

DIY Painting Tips for Tipi Tepee Teepee Owners

Canvas is the preferred choice for painting by artists today. Art Supply stores everywhere sell per-stretched canvases that have already been gessoed for you. These manufactured canvases are great for everyday practice or the traditional commissioned piece but what do you turn to when you want something that is unique to start? Tiny Tipis offers you an idea: Paint Your Own Tepee. Tiny Tipis offers custom paint and bead work but we understand that some people may want to take the art into their own hands. Thus we are handing out any of our knowledge for free so you can customize your own canvas teepee. The tips that follow in this article can be applied to Tiny Tepees or Large Teepees as well. 

When you start your painting adventure you will need to have the following items handy:
  • Paint Brushes of various sizes. For a softer line use synthetic bristles, for a more crisp and clear line use natural bristle.
  • A container of water. Make sure you use a container you don't care about in case you want to toss it afterwards.
  • Acrylic Paints in the colors you will be using. The choice of acrylic paint is important and will discussed further below.
  • An Acrylic Thinning Solution such a Flow Release, Liquitex, or anything comparable that you find at your local hobby store.
  • An old rag you can wet and dab with in case of spills or mistakes.
  • A board or hard surface you can use as a palate to mix your paints on.
  • A strong string, straight edge (ruler), drop cloth, and a pencil.

The type of paint you choose will effect the final product greatly. Two standards must be met for the paint to be as sturdy as possible when finished: It must be Acrylic and it must be Fluid. Fluid refers to water based and can be thinned with water but is not recommended as this changes the pigment content (making the colors less vibrant) and the ability of the paint to bind to the surface of the canvas. If you aren't sure by looking at the label then ask someone who works at the hobby store, they should be able to direct you to the correct paints.

Once you have gathered your supplies you are ready to decide what design you want to paint on your tipi. Stencils work great and are very easy to do. The more geometric the pattern the easier it will be as well. Decide if your tipi will be displayed standing up in a cone shape or laying flat in a display. If your teepee will be displayed flat then you can paint on it as you would a regular canvas. If you plan to set your teepee up after painting then you will need to consider the 3D nature of it. Here are a few tips on making simple designs for a standing tepee:
  • To paint horizontal stripes: Find the Center of the Tepee 2 inches above the Tie Flap. Anchor one end of your string here so that neither the tipi or string changes position. Find the point where the string meets the edge of where you want your stripe. Place the pencil at this point on the string and secure it by tying it in place or holding it firm with your fingers. Pull the pencil around the tipi in a semi circle where you want your stripe. Don't draw too dark or use a pen in case you mess up. Keep repeating this where you want the edge of a stripe to be until you have all your guide lines drawn.
  • To paint vertical stripes: Find the Center of the Teepee two inches above the Tie Flap. Mark this spot and ensure the tipi and mark won't move while you are drawing. Line one end of your straight edge up with the mark you made just above the center and the other end where you want the stripe to start at the base. This way the stripes will taper as they go toward the top creating the illusion of a taller Tipi.
  • To paint triangles along the base: Decide how many triangles you want around the bottom of the tipi. Divide the length of the hem by how many triangles you plan to paint and use this number to make the bottom edge of a stencil. The other two sides of the triangle will be equal to each other. Smaller triangle sides will create a shorter border around the base of the teepee while longer sides will make a taller border. When your get your stencil made lay it on the canvas and trace around it lightly over and over until you have the whole hem covered.
Now you are ready to paint! Use a drop cloth if you are doing this indoors on floors you like or gather clean rocks to keep the edges from blowing up if you are doing it outside. If you are painting a Tiny Tipis brand Tipi I would suggest indoors since they are small enough to run away from you with a good gust before they get staked down.

If you desire the paint to stay on the surface like it would with a traditional stretched canvas you will need to gesso the surface first. If you want the paint to soak into the canvas more then you won't need to worry about that.

Mix your paints according to the directions on the labels. Remember you can use water to make your acrylics thinner and soak in better but water will destroy the bonds of the paint quicker than product made specifically for that. The purpose of thinning is so that the paint soaks into the canvas more and also to reduce the chance of the paint cracking as it gets older or if you have to fold the tipi cover. If you plan to set your tipi up outdoors I highly recommend Fluid Acrylics By Golden Acrylics in conjunction with their brand of Flow Release. This will withstand the test of time and the elements better than anything else on the marker but they are pricey if you are on a budget.

If you make a mistake while painting quickly dip your rag into your bucket of water and dab the mistake. Don't rub! This will spread the paint around making your mistake even bigger! If you gessoed your canvas tipi cover first it will be a little easier to clean up any mistakes. Go slowly when painting close to the lines since a slight twitch of the hand can cause your perfectly smooth line to look jagged. The smoother your lines the more professional the painting will look.

When you are done painting make sure to let the Tipi Cover dry for at least 4 hours before moving it. If you move it before the paint dries fully you risk drips, smears, and areas of darker pigment where the paint pools.


   This informative article brought to you by Tiny Tipis LLC. Tiny Tipis is a small handmade company providing environmentally friendly products to help customers reduce their carbon footprint. We focus on using high quality materials with attention to detail and running our company as close to zero waste as we possibly can. All shipping materials are recyclable, compostable, and/or biodegradable. See more of what Tiny Tipis does for our planet at any of the links below:


 Thank you for being environmentally responsible!!!

Saturday, March 3, 2012

Why Do I Make Tipis in a Series?

Lacing Pin Strip on a Tiny Tipi accented with Rose Petals
As an artist, seamstress, and tepee maker; I am inclined to find a special beauty in each thing that I create.  The artist in me strives to give a personality to each little tepee while the seamstress demands perfection in every seam. With teepees I decided to make them in a series much like a painter would make a series to show how they studied a subject from every angle. The resulting tipi cover is impressive.

What is a series?
     According to TheFreeDictionary.com a series is:
              1. a group or connected succession of similar or related things, usually arranged in order

 I define my series by pattern and material. I research the tipis of the tribe I chose and translate it into a functioning miniature version. I then use this teepee pattern to sew as many small tepees as I can from one batch of canvas.

I buy canvas according to quality, quantity, and price. Sometimes I buy as little as 5 yards and other times I buy much more. The amount of canvas isn't as important to me as the properties of it. One cut of fabric becomes a single series of tiny teepees. In this way each tepee becomes a work of art even when the canvas is blank.