Showing posts with label start. Show all posts

Thursday, July 5, 2012

Step-by-Step Vintage Hunting Vest Upcycle

     I was browsing the items at a yard sale one day when I found this treasure of a hunting vest. The piece had character and had seen many days of love and use but lacked any kind of style that would make me wear it in public. So I decided to redo it! With a little lace and an hour of my time I transformed this beast into a beauty. Here's how:


     1) I removed the fabric on the back that just kind of hung there using my seam ripper. This took maybe 10 minutes.


2) I got a bit impatient and added lace around the collar next. To do this I buttoned the vest and marked where the left and right sides came together above the buttons. I don't use pins when I sew so I just folded the lace under and started using a zig-zag stitch to attach it where my first mark was. I didn't cut the lace to length until I was perhaps 2" away from having it fully sewn on the front. Then, I tacked the lace down every so often to keep it from rolling up around the neck while being worn.


3) I used my seam ripper to finish separating the fabric below the arm. I wanted to give the vest a more feminine shape so to accomplish this I measured 1" in on each side at the base of the back. I connected this to the top where the armhole comes together. That's the brown line you see in the photo. I cut the excess off and sewed the seam back together. If you aren't confident in your altering skills you can always pin and try it on before you trim.


4) The last step was to add lace along the back where I took the old fabric panel off. To do this I once again folded my lace under at the edges and used a zig-zag stitch to attach it to the vest. Again, to avoid wasting lace, I always sew first and cut the lace to length when I'm a few inches away from having it completely sewn on. This eliminates concerns about elasticity differences between the vest and the lace.


     I left the back of the vest shorter than the front as a style choice. I like the way it causes the fabric to add even more of an hourglass shape around the waste. This can make boobs look bigger, mid sections look slimmer/longer, and hips look more feminine. Below is the end result... it's hard to get good pictures of yourself! This vest can be purchased on my etsy store if you like it as much as I do.


Thursday, June 21, 2012

Fabric Bowl Project Obsession

http://whipup.net/2008/09/20/how-to-fabric-bowl/
I've been a bit obsessed with fabric bowls this week. What a useful concept! They are washable, portable, and nearly unbreakable (perhaps the most useful feature for a stay at home mom.) I saw a picture on pinterest of a tutorial on how to crochet a sturdy bowl using multiple threads. When I clicked the link of course they wanted $4.99 for the "pattern" so as a seamstress/artist/creative type I stared at the picture for a moment and then set about making myself a bowl. I've since moved on to making nesting bowls for my husband and I's fifth wheel as these proved so nice.

First I would like to cover the various types of Cloth Bowls I saw. There are wrapped and sewn bowls, pattern sewn bowls (I call them petal bowls because of how the pattern looks before sewn), woven bowls, glue hardened bowls, and crocheted bowls. Of these types of handmade bowls the ones hardened with glue or fabric stiffener are the least portable. A soft bowl can be folded so that it fits in a small flat area and takes up less space - something I appreciate very much for storage space in the camper.

I decided to try the crocheted bowl since I had the materials readily available. Since there are two threads involved it makes the bowls a little stronger and more able to retain shape. The outer thread that is seen is plain yarn while the inner thread is an old t-shirt I cut into strips. The t-shirt yarn is thicker than the regular yarn so it gives the bowls the stability the standard yarn lacks. As you can see in the photo I used a single crochet and simply worked my stitch around the t-shirt yarn. When I've completed 10-15 stitches I gently tug the t-shirt yarn and it tightens everything. I repeat this the whole way through giving the bowl a more finished look. Don't tug too hard on the t-shirt yarn though or it will cause the prior stitches to buckle. 

I don't really have a formula or pattern I follow. I increase stitches and do my best to keep the first few rows flat and even because these become the base of the bowl. When I have the base 10% larger than looks needed I stop increasing so the sides will start to come in. I like to pull the sides of the  bowl in at the top as an extra stability feature. I do this by decreasing stitches on the top 2 rows only. I do the top 2 rows with a contrasting standard yarn and no t-shirt yarn filler. 

You can cut the t-shirt yarn and simply leave it loose in the stitches over it or you can pull it out and use it as a decorative stabilizer. I pulled my white t-shirt yarn out when the main bowl color ended and stitched it in swirls around the exterior of the bowl. This seemed to pull the various rows together even more and added a look I liked. 

The first bowl I made. It contains my husbands lighters on the counter.
There are no limits to these bowls except your ability and creativity. Crochet stitches come out so try something new. If you don't like it just pull it out!

To see other things I've made that are for sale or to request custom items and art visit my Etsy Page.


Monday, May 14, 2012

Garden Girl

Project One

I've been constantly pinning lovely pictures full of ideas on how to plant useful greens in recycled things. These gardens are all very inventive in the ways that they find to transform ordinary trash into marvelous containers of life. They conjure up visions in my head of how I can transform an empty entry way, use recycle things from around the house, and save my family money on groceries. Today, all of these lovely visions saw a chance to bloom.

As my mother and I shopped I told her about my dreams of having a tiny garden in my unused entry way. The small room is 5' x 8' and completely occupied by concrete stairs rendering it mostly storage right now. The windows are huge though and let in plenty of light and the walls are a lovely semi-flat white. I told my mom of 2-litter bottles turned into hanging planters and egg cartons used to start seeds. I talked of worn out bra's and rain boots with holes all filled to the brim with soil and plants.

"So buy some seeds and start a garden." Mom said.

"Alright, they sell seeds here. I will."

My husband agreed that if it gets too cold in the "green room" this winter we can find a small heater with an auto shut off feature to keep it warm. The electric bill shouldn't be nearly as much as our produce bill the last few months.

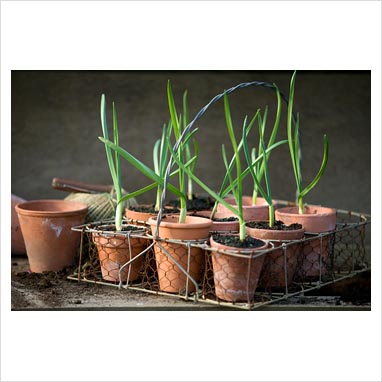
This afternoon I carefully set a bunch of tiny seeds into 1" tall Terra Cotta pots and set them in the window to grow. Tommorrow, I will take the 2-litters of Pepsi I saved and start prepping them for the next phase of growth. By the time my little herb garden is ready to transplant hopefully I will have plenty of hanging planters to put them in.

Current Project Expenses: $4.07  - seeds and starter soil


For more inspiration on your own garden or to see the photos that have inspired me follow me on Pinterest at pinterest.com/TinyTipis.

Shop Tiny Tipis creations on Etsy.

UPDATE!!!

Follow my Garden Girl updates on the Blog Recycled Urban Gardening! 


Sunday, April 29, 2012

A Day to Travel

270 Miles to Learn

   I took a trip yesterday. It was the longest I've been away from my son since he was born as well as a large step for my company. I managed to visit Ralph's Sewing Machines to look at future investments, stocked up on smudge sticks, traveled to an intentional colony to propose a Tipi job, visited some friends, and saw a wonderful play.
Grandma's Tomato Pin Cushion

  My day started shortly after 8 am when I left the house and dropped off items at the Post Office on my way out of town. I stopped at the sewing machine store in Denver only to confirm I was right in assuming an industrial sewing machine would cost me around $1,200. On the upside it would last me a lifetime with how well I treat my machines and Ralph's offers excellent service on the machines they sell.
Inside of my current machine

     I left the sewing shop and headed to Wings of Eagles, a Native American themed store, in the Heritage Shopping Square in Golden. It was my first time there and after a lengthy drive that involved many U-turns I found them. My grandmother recommended I get my smudge sticks there, it was where she went when she lived in Colorado. They had local artists on display along with jewelry and other assorted Native American items.

I took a quick lunch break in Boulder to try a local coffee shop's Salami, Tomato, Basil, and Mozzarella Panini along with a cup of joe. It was fabulous! The potato chips were homemade (score!) but didn't have any salt. I couldn't find any salt in the place either.  :/  I still ate them all and got a 25 cent refill on my coffee.
Salami Tomato Basil Mozzarella Panini at a Coffee Shop in Boulder
     
     After lunch I headed to the intentional colony outside of Loveland to propose a tipi job to them. Long story short: an almost epic failure. Realizing that I have no business education and, try as I may, had no one to rehearse with; I would say I tried my hardest. I'm still disappointed in myself though. What was I thinking when I forgot a business plan? Even I know that's step one. Failure two...? Not knowing the mathematics behind how my product would benefit the company investing me. Wow, I messed up. There's really no other way to say it. On the bright side the gentleman who was kind enough to take the time to meet with me seems open to letting me have a "do over." Rest assured, if I am lucky enough to have another go at it, I will be over prepared if I'm anything.

     I was able to chill with my friend, Adam, from high school after the meeting. It was nice being able to catch up and see how each of us has grown up. He is working at the intentional colony currently and enjoying dating a girl he met there. They seem to be of like minds, which I know is a rarity for him to find. Such a unique mind, I feel blessed to have friends that form their own thoughts and opinions.

     After Adam and I painted a Canvas Bag I designated as my "Tiny Tipis Promotional Bag" I headed back to Boulder for a musical another of my dearest friends was in. "Beautiful Radiant Things," by North Fork's own Marty Durlin, was one of the best theatrical experiences I've had the pleasure of viewing. The music was fitting, the humor was witty, the message was bold, and the acting was top notch (and consider the performers volunteered their time!) I was able to catch up with my friend Marian afterwards, which; made the entire drive worth it. She is such a gentle soul, so amazing and beautiful inside and out. She inspires me.

     Finally after a long day I headed home at around 10 pm. The long drive was made short by all the lessons I had to mull over in my head. My mind wandered between possible improvements to my business and things that had been said between friends that day. It was sort of overwhelming to a woman who has almost grown accustomed to seeing the same four white walls every day... not bad though. Not bad at all.
It's all for Tipi Tepee Teepee Love


Sunday, April 15, 2012

Tiny Tipis Goes International

A Simple Inspirational Moment

Shipping is a major part of any company these days as the internet digs it's claws deeper into every corner of the earth. People in Russia could be reading a blog that you might have written for an American audience! Such is the nature of the beast though with Twitter, Facebook, Pinterest and the likes taking over the generation I grew up in. Today, I discuss shipping because I had a first for my business. Today, I shipped Internationally for the first time.

I hadn't planned on shipping globally yet. I figured it would be months, maybe even years, before I would need to. When I received a note from the buyer saying I could send it to either a United States or Australian address I was at first inclined to send my canvas items withing where I am familiar, but; that brought up questions. What would it cost? Was it reasonable? Should I expand my company to serve that many people?

I quickly pulled up the USPS website and typed in the info I had. The page loaded and I scanned down the prices until I got the option I normally use within the US. Well, I thought, that's not as scary as I expected. Besides, it really wasn't up to me if it was reasonable or not. The buyer could decide for themselves.

I sent my customer the prices I calculated plus a dollar of buffer. I gave them more options than I anticipated I could have this early on. The response came quick along with a paypal payment to my account. The deal was good! I had my first customer located in Australia and my first chance to expand past the boundaries of the United States.

The next morning I packed my truck with boxes and envelopes to ship including the envelope marked for Australia. My stomach gurgled at me with nerves as I hopped in the drivers seat. I knew the principal of what I had to do. Step 1, find the correct forms. Step 2, figure out how to correctly fill our said forms. Step 3, hope I calculated my prices right.

I was lucky and got to the Post Office during a slow time so there wasn't a line. It always makes it easier to interrogate the workers about shipping regulations when there isn't a chain of angry impatient people behind you. To my surprise, I had grabbed the exact forms I needed. Check a box here, enter a weight there, fill in the addresses, and sign the bottom... the lady stamped the square in the corner of the page I filled out and complemented me on needing minimal guidance.

I asked if there was a way I could take a few extra customs forms so next time I needed to ship international I would be more organized for them. The lady helping me was thrilled. "Of course!!! We encourage it!"

On my way home I thought about all the times I had mailed letters as a child. As I grew up technology started to take over the times I would have normally slapped a stamp on an envelope. Bills, letters to family, photos, Christmas cards with money... all things I can do easier from a computer.

I felt triumphant. It didn't matter how simple the process was, it was something I was clueless on and highly unsure of. I had shied away from it but now I saw that there were so many more customers available. Shipping need not stop me now.

For today I close with this thought:

 May we never stop learning with soft hearts and open minds. Let us conquer the world with love and knowledge. Never give up.


Tuesday, March 20, 2012

Catch My Dreams -Featuring Dream Catchers made by Tiny Tipis

Dream Catchers are a popular part of Native American Art and culture; but, not many people know the history and legends surrounding them. Very few dream catchers sold in stores are "real" dream catchers these days as they are made from non-natural and processed materials. Let's take a step back and investigate the origins, legends, and traditional materials that led to the popular Native American themed decorations.
All Natural Dream Catcher with Beaded Green Leaves by Tiny Tipis

According to Wikipedia dream catchers originated with the Sioux Nation but spread among the other nations to represent many things. They have also been said to have originated from the Chippewa tribe (also Ojibwe or Annishnabe). Some tribes considered them to be a symbol of unity between peaceful nations while others thought of it as protection from night terrors. Still, present day popularity presents a challenge for the Native American dream catcher as certain people consider it too commercialized.

The legends surrounding dream catchers vary greatly from tribe to tribe. According to Soul Tones:

"An ancient Chippewa tradition
The dream net has been made
For many generations
Where spirit dreams have played

Hung above the cradle board
Or in the lodge up high
The dream net catches bad dreams
While good dreams slip on by

Bad dreams become entangled
Among the sinew thread
Good dreams slip through the center hole
While you dream upon your bed."

The First People website describes the Chippewa Legend as follows:

"A spider was quietly spinning his web in his own space. It was beside the sleeping space of Nokomis, the grandmother. Each day, Nokomis watched the spider at work, quietly spinning away. One day as she was watching him, her grandson came in. "Nokomis-iya!" he shouted, glancing at the spider. He stomped over to the spider, picked up a shoe and went to hit it.
"No-keegwa," the old lady whispered, "don't hurt him."
"Nokomis, why do you protect the spider?" asked the little boy.
The old lady smiled, but did not answer. When the boy left, the spider went to the old woman and thanked her for saving his life. He said to her, "For many days you have watched me spin and weave my web. You have admired my work. In return for saving my life, I will give you a gift."
He smiled his special spider smile and moved away, spinning as he went.
Soon the moon glistened on a magical silvery web moving gently in the window. "See how I spin?" he said. "See and learn, for each web will snare bad dreams. Only good dreams will go through the small hole. This is my gift to you. Use it so that only good dreams will be remembered. The bad dreams will become hopelessly entangled in the web."

Most tribes have similar variations of these legends. The reason for the name dream catcher is apparent in the legends as the spider's web catches only the bad dreams but lets the good dreams float on by. The heart-warming qualities that make people love them can be seen in the nurturing side that personifies the spider as a gracious and kind being.
When dream catchers originally started being made the Natives didn't have access to glass beads, metal hoops and the likes so they would use what nature provided. Willow branches were the most common since they were so easy to bend into a circle. The original dream catchers were all natural and as a result they broke down over time. Modern dream catchers use manufactured materials for cost reasons, to extend the life expectancy, and also because it is easier to produce a consistent product. These man made material products lack the feel of a real dream catcher even though they may be more visually appealing to the consumer in some cases.

Dream Catchers symbolize many different things to people. The legends that surround them and the meanings are almost as varied in history as they are today. Each person must find the meaning that fits them best for we are each as unique as the dream catchers that catch our dreams.

Monday, March 12, 2012

The Start of Something Charitable

A disable dog in China is equipped with a cart to help him walk
There are many reasons people give to charity. Some people like to help others, some like to feel like they've done a good deed, and others do it to look impressive to those around them. I'm not sure there can be a good or bad reason to help a charity. As long as a person in need is being helped the purpose of giving that help is between the person giving it and the greater good they answer to.

Adopting a dog can save it from being euthanized
I like to help because I hope that should I ever fall on hard times someone would return the favor and give me a hand. We all hit low points at some time or another. It's impossible to get through life alone. This is why when I saw a discussion thread on Etsy about artist collaborating to donate art for a proposed charity auction I joined in. Even though this idea is in the beginning phases I see a spark there, a hope of helping others. I see an even better reason to make beautiful things than I previously had. I see hope for someone in need inside the creative genius of artists brought together for a cause.

The charity it goes to doesn't concern me much honestly. Don't get me wrong, I would love to see the money go to an animal rescue. Animals never try to be evil like people. Animals can't help themselves to the extent people can. The creatures of this earth that we have tamed and bred to be part of our families help us in our times of need. They give us love and friendship, never judge us, and sometimes they even save us when our life is on the line. How could man ever repay such a debt?

A Small Kitten in the Safe Hands of a Firefighter
Regardless though, I find the whole idea invigorating. Not only could multiple charities receive donations but local artist could be given an opportunity to gather together and create art in groups. I see the possibility of uniting people on so many levels! Is this not the first step toward the next phase of man kind? We all unite for a greater purpose, people come together to support each other and try to be better as a whole. There's always room for improvement! Let's never stop reaching for a better world.


Tiny Tipis thanks you for taking the time to read this article. We hope you have been inspired to help others. Contact us to see what other charity events we will be involved in.